Showing posts with label Tips. Show all posts

How to create fake DP(Default Pic) for any whatsapp contact

By // 12 comments:
, , , , ,
whatsapp_logo
Whatsapp has become a part and parcel of our daily life. Now a day nearly everyone is present on the Whatsapp and most of them check their Whatsapp every hour. It has became the primary medium to send and receive message. In addition to text messaging, users can send each other images, video, and audio media messages as well as their location using integrated mapping features. The client software is available for Google Android, Microsoft Windows Phone OSBlackBerry OS, Apple iOS, selected Nokia Series 40, Symbian, selected Nokia Asha platform, and BlackBerry 10.
  How to create fake whatsapp status
  how to create fake chats and edit old chats on whatsapp 
 
Before we start you will need three main things :
1. A rooted android device
2. An application that can be used to disable/freeze application ( Link2SD(free)/ Titanium Backup/ Other )
Learn to Disable And Enable App Using Link2SD
Learn to Disable And Enable App Using Titanium Backup
3. A file explorer with root access ( EsFile Explorer(free) / Root Explorer / Other )

Steps to create fake DP(Default Pic) for any whatsapp contact

Step 1: Open your Whatsapp, search the contact whose DP you want to change and note down his/her phone number with country code but without '+' sign. Also open up the Default pic of contact to create an entry in the sdcard.

Step 2: Take an image (should have extension .jpg) that you want to set as the DP for the contact and create two images one of size 640 X 640 pixels(you can choose any value but image should be square) and other of size 96 X 96 pixels, if you don't know how to crop and resize a image read this tutorial : How to crop and resize an image in Microsoft paint

Step 3: Now rename the image of size 640 X 640 by the phone number noted in step 1. Rename the second image of size 96 X 96 by [phone_number]@s.whatsapp.net.j [phone_number] represent the number noted down in the step one. While renaming the second image you have to change the extension of .jpg image to just .j 

selected_images
Step 4: Copy both the images into your phone. 

Step 5: Now disable/freeze Whatsapp from the system using Link2SD/Titanium Backup/ Other. Also turn off your mobile network/ wifi.

titanium_backup

Step 6: First we need to change the thumbnail of the contact to do that first of all make sure your file explorer have root access. Now copy the image [phone_number]@s.whatsapp.net.j and paste it at /data/data/com.whatsapp/files/Avatars. If it ask permission to replace the old image click on Yes.
Now defrost the frozen Whatsapp using Link2SD/Titanium Backup/ Other to check that thumbnail of the contact is changed.
avatars_folder

Note : Skip Step 7 if the contact does not have any DP because in that case we can only change the thumbnail and don't click on the thumbnail to enlarge the DP of the contact as this will result in removal of the thumbnail that you pasted  in Step 6.

Step 7: Locate Whatsapp folder( it could be in phone memory or sdcard) after that copy the image of size 640 X 640 and paste it to Whatsapp/Profile Pictures. If it ask permission to replace the old image click on Yes. This location store the images that appear when we click on the small thumbnail of the contact.
Profile_picture_folder

Step 8: Now defrost the frozen Whatsapp using Link2SD/Titanium Backup/ Other.

titanium_backup_unfreeze

How to crop and resize an image in microsoft paint

By // 5 comments:
, , ,
MS Paint or Microsoft Paint is a simple and easy to use computer graphics program that comes with all the versions of Microsoft Windows. Formerly known by Paintbrush for Windows. It is often referred to just as Paint. MS Paint provides a large number of basic operations like adding text to a image, creating background for a image, creating pixel based images, and a lot more. In this post  I will explain how you can crop and resize a image in Paint.

Opening an Image in MS Paint

Go to the location where the image you want to crop or resize/scale is stored. Right click on the image and select "Open with" and click on "Paint". This will open up your image in MS Paint.


Steps To Crop an Image

Step 1 : Use the zoom ratio present at the bottom left corner to control the display size of the image.


Step 2 :  Crop tool is the default selected  tool when you open up paint. Selection shape is set to "Rectangular selection" which is used most often. But their is one more selection shape known as "Free-form selection", it allows you to freely draw an area of any shape and clip it from the image. Click on "Select" present beside selected Crop tool to change the selection shape. It also have Selection options, out of all the selection options "Invert selection" is most important. It is used to when you don't want to include a selected region of an image.

Step 3 : When you draw the Rectangular selection box to select a portion of image its size appear in the bottom bar of Paint this can be used to create selection box of a fixed size.


Step 4 : After making the selection press "Ctrl + C" to copy the selection area. Open one more Paint application (Go to start and type paint). In the new paint window press "Ctrl + V" to paste the Selection. Now press "Ctrl + S" to open up the save dialogue box.

Resize / Scale an Image in MS Paint

Step 1 : Select the "Resize" option from the Home tab of the Paint. This will open up the "Resize and Skew" option box.


Step 2 : Now if know the pixel size ( H x V ) to which you want to scale the image enter the H and V value in Horizontal and Vertical box respectively and click on OK to resize the image. You can also use "Percentage" option to resize the image, most commonly used percentage ratio are 75%, 50%, 30%, and 200%. Skew is used to add slanting effect to the image.


Damaged SD card problem while using pendrive with USB OTG

By // No comments:
,
In this post we will solve the damaged SD card problem which appears in notification bar while we are accessing our pen drive through our android device with the help of an USB OTG.

USB_OTG

Step 1: First take out your pen drive and see if you are able to access it on your PC. If you can access it
            through you PC that means the problem is in the file format and we can mend it.

Step 2: Copy all your stuff from your PD in a separate folder.We need it for later use.

Step 3: Right click on your PD and click on Format.    
Pendrive_format_option


Step 4: Now choose FAT32 from the drop down menu of File System option.
           
fat_32_option

 Step 5: Start the formatting a warning will appear just click on OK.


format_message
            

Step 6: Once the formatting is completed, you can copy your stuff back from the folder we have created in
            Step 2.

Step 7: Now you can easily access all your stuff from your PD by using your android phone and USB OTG.

External hard disk not visible

By // No comments:
,
external_hard_disk_not_visible
In this post I will explain the step by step solution to common problems that usually occur with the External Hard disks or with the HDD external case.  When you connect the external hard disk to your device it doesn't show up with other drives in Computer . Just to be sure before we start please check all the connections of your external hard disk. OK !!! Let's start.

Step 1: Right Click on "Computer" and select "Manage". This will open up the "Computer Management".
manage_option

Step 2: In Computer Management go to Storage and select Disk Management.
disk_management

Step 3: Your Hard disk should be visible here if it is not their could be a problem with your external HDD case or cables or your PC's USB port. Try connecting it in someone else PC. Now if your hard disk is visible here the most common problems are initializing problem and drive letter problem. The drive letter problem usually happen when you install HDD in the HDD case. In this problem you will be able to view the amount of storage capacity of your external hard disk. While in initializing problem storage capacity will not be visible.
partition_image

Step 4:(Optional) Backup all your data using some backup software. Different software work best with different HDD.

Step 5: If it is Initializing problem try reconnecting it once more if that doesn't solve the problem then right click on the disk you want to initialize and click "Initialize Disk". That's all for initializing problem. WARNING !!! THIS WILL FORMAT ALL THE DATA AVAILABLE ON YOUR DISK..

Step 6: For the drive letter problem right click on the disk if assign drive letter is not grayed out select it else select "Delete Volume" option. This will make the selected disk unallocated. If the disk become free space right click on disk and select "Delete Volume". WARNING !!! THIS WILL FORMAT ALL THE DATA AVAILABLE ON YOUR DISK..
delete_volume_option

Step 7: After that right click on the black unallocated space and select the first option "Simple New Volume". This will open up a wizard to create a new volume make selection according to your preference and click on Next. That's all you should be able to use your hard disk now.

International Calls from Your Hangouts in India

By // 6 comments:
, , , ,
hangout_calling
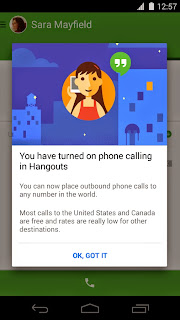
Google on Thursday announced that it will let people in India use the Hangouts app for Android mobile devices and the Hangouts in Gmail to make free or low-cost international voice-calls over the Internet.After you had turn on voice calling in Hangouts, you can make domestic and international calls through a data connection . You can also receive calls if you have a Google Voice number. It’s always free to call other Hangouts users, it’s free to call numbers in the U.S. and Canada, and the international rates are really low.

Steps to Turn on calling on Hangouts app

  1. Download the Hangouts dialer on Android devices. The Hangouts dialer turns on calling in the Hangouts app.
    hangout_screenshot
  2. If you don't have the latest version of the Hangouts app on Android devices, download the Hangouts app on Android devices.

To make a Call

  1. Open the Hangouts dialer. This will open the Hangouts app and turn on calling.
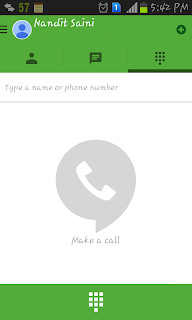
  2. At the top of the Hangouts app's screen, touch the dial pad icon .

    hangout_screenshot
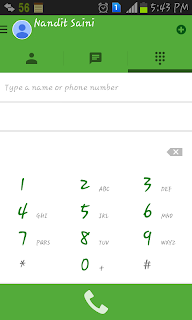
  3. Type the name or phone number you want to dial. Or to dial a number using the dial pad, touch the dial pad icon at the bottom of the screen. Then dial the phone number you'd like to call, and touch the phone icon .

    hangout_dial_pad

First minute free for 25 countries

The first minute of most calls to 25 countries are free, and you’ll be charged for each minute there after. Calls where the first minute are free will say, “First minute free” on the call screen. If you don’t see this message, then you’ll be charged for the first minute.
To receive the first minute of your call free:
  1. Add calling credit to your Google account by following the following steps
    • Open Hangouts in Gmail or Google+.
      Gmail: In the bottom-left corner, click on the Hangouts icon .
      Google+: In the top-right corner, click on the Hangouts icon .
    • Click the search button
    • Click the phone button
    • Click the drop down list below search box that shows available credit.
    • Select Add credit.
    • A new window will open and take you to Google Voice. If you don’t have a Google Voice account, follow the instructions to set one up. If you already have a Google Voice account, click Add $10 credit.
    • Complete your credit purchase through Google Wallet.
    • You can see your balance in the future by going to the “Billing” section in Google Voice.
  2. Make one call at a time. If you try to make more than one call at the same time through Hangouts, only one of them will get the first minute free.
  3. Call one of the 25 countries where the first minute is free, subject to usage and abuse limits.*

How to make secure calls on Android?

By // No comments:
, ,

Wanna make secure calls on android? Then you are at the right place!

We are gonna make encrypted phone calls with the help of Ostel.co .
This is an open source community projects, which do not keep logs or records of who is calling whom. And phone numbers are not tied to personal identifiers so you can remain truly anonymous.
Calls can be made over wifi or cell network.

About Ostel
Ostel is a tool for having end-to-end encrypted phone calls. Our goal is to promote the use of free, open protocols, standards and software, to power end-to-end secure voice communications on mobile devices, as well as with desktop computers.

Here is a complete step to step guide on how to do it.


1. Go to the website Ostel.co
2.Check out all the features of Ostel.
3.Scroll to the bottom and register an account.
4.Choose a name so your friends can find you.
5.Create a password.
6. Now your info is displayed below and send to your email.
7. Download CSipSimple for android.

8. Install CSipSimple on your device
9. Open CSipSimple
10. Press the key icon to add an account.
11. Add an account


12. Scroll down and click the Open Secure Telephony Network (OSTN) account wizard under Expert.
13. You'll find empty account info
14. We emailed you the account info.
15.  To confirm it works, you'll see OSTN turn green. We're registered!


16. Dial 9-1-9-6 to do an echo test.
17. In the echo test, you should be able to hear your own voice. Say cheese!
18. Great! Now lets call a friend.
19. A confirmation code will pop up, when the pick up the call. Read it to them. If both of you have the same code, you're secure.


Taken from: https://guardianproject.info/howto/callsecurely/
Here is a youtube video to help you
https://www.youtube.com/watch?v=BrNC8Mk26Z8
Here is the link of android app needed for making secure calls
https://play.google.com/store/apps/details?id=com.csipsimple


Resourses:  https://ostel.co/
                  https://guardianproject.info/howto/callsecurely/
                  https://www.youtube.com/watch?v=BrNC8Mk26Z8
                  https://play.google.com/store/apps/details?id=com.csipsimple

How To Create Contact Us Page In Blogger

By // 1 comment:
, , , , , ,
Contact Us page is a quite important page of a blog/website it provides a easy way to the audience  of blog/website to directly contact the admin of website. You can quite easily add contact us page to your blogger by using contact form widget and a little trick. Let's start.

Steps To Add Contact Us Page In Blogger

Step 1: First of all take a Backup of the blog's template. Select the Template option from the main menu and click on Backup/Restore present on the top right corner.


Step 2: As soon as you click on the Backup/Restore a pop-up will appear select the Download full template to start the download of your template. If you want to Restore your template you just have to select the latest downloaded template and click on Upload.

Step 3: Now we gonna add the Contact Form widget to the blog. To do so select the Layout option from the menu present on the left. After that select Add a Gadget then go to More Gadgets, find and add the Contact Form.
Step 4: Go to the option Pages present in the main menu on the left and create a new page with name Contact Us.


Step 5: In a new tab of your browser (do not close the Contact Us page tab) open up your blog/website you will found a Contact Form as shown below, right click inside Contact Form and select Inspect Element.

Step 6: In the Inspect Element window right click on the line  <div class="widget ContactForm" id="ContactForm1">...</div> and select Copy as HTML ( Copy Inner HTML if you are using Firefox ).


Step 7: Now get back to the Contact Us Page tab and paste the copied HTML content. If you click on Preview you will found that their is heading Contact Us that's the name of our page and below it their is another heading Contact Form which seems a bit odd, to remove that second heading delete the line <h2 class="title">Contact Form</h2> highlighted below.

Step 8: Select the option Page setting present on the left. Set Reader comments option to Don't allow, hide existing leave the remaining two as it is and click on Done. The Contact Us page is complete click on Publish to publish the Page.

Step 9: You probably have noticed the Contact Form widget is appearing on every page of your blog/website and that doesn't look good now that you have your own amazing Contact Us page. Let's deal with this tiny problem. Go to Template option from the main menu and select edit HTML.

Step 10: Click inside the HTML Code, press Ctrl+f then type contact form inside search box and press enter. This will take you to the Contact Form widget's HTML code. Click on the solid triangle on the left to expand the code.

Step 11: Delete all code that is present between <b:includable id='main'> and </b:includable>. After the deletion the code should look like this :
Step 12: Click on Save Template if you trust me and yourself, else click on Preview Template then click on Save Template. If have any query feel free to comment below.