Showing posts with label Windows. Show all posts

How to crop and resize an image in microsoft paint

By // 5 comments:
, , ,
MS Paint or Microsoft Paint is a simple and easy to use computer graphics program that comes with all the versions of Microsoft Windows. Formerly known by Paintbrush for Windows. It is often referred to just as Paint. MS Paint provides a large number of basic operations like adding text to a image, creating background for a image, creating pixel based images, and a lot more. In this post  I will explain how you can crop and resize a image in Paint.

Opening an Image in MS Paint

Go to the location where the image you want to crop or resize/scale is stored. Right click on the image and select "Open with" and click on "Paint". This will open up your image in MS Paint.


Steps To Crop an Image

Step 1 : Use the zoom ratio present at the bottom left corner to control the display size of the image.


Step 2 :  Crop tool is the default selected  tool when you open up paint. Selection shape is set to "Rectangular selection" which is used most often. But their is one more selection shape known as "Free-form selection", it allows you to freely draw an area of any shape and clip it from the image. Click on "Select" present beside selected Crop tool to change the selection shape. It also have Selection options, out of all the selection options "Invert selection" is most important. It is used to when you don't want to include a selected region of an image.

Step 3 : When you draw the Rectangular selection box to select a portion of image its size appear in the bottom bar of Paint this can be used to create selection box of a fixed size.


Step 4 : After making the selection press "Ctrl + C" to copy the selection area. Open one more Paint application (Go to start and type paint). In the new paint window press "Ctrl + V" to paste the Selection. Now press "Ctrl + S" to open up the save dialogue box.

Resize / Scale an Image in MS Paint

Step 1 : Select the "Resize" option from the Home tab of the Paint. This will open up the "Resize and Skew" option box.


Step 2 : Now if know the pixel size ( H x V ) to which you want to scale the image enter the H and V value in Horizontal and Vertical box respectively and click on OK to resize the image. You can also use "Percentage" option to resize the image, most commonly used percentage ratio are 75%, 50%, 30%, and 200%. Skew is used to add slanting effect to the image.


Error MSVCR110.dll Is Missing : Solved

By // No comments:
, , ,
It is a annoying error which usually happen due to the errors in the registry files, corruption of MSVCR110.dll due to some reason or removal of MSVCR110.dll by some program/virus. Whatever might be the reason for getting this error, you will not be able to run some programs like WAMP, XAMP and other. MSVCR110.dll error also sometimes causes problem with normal windows startup ( if you are unable to start windows normally due to this error use the safe mode ). Here's a screenshot of the problem :
MSVCR110.dll Is Missing Error

How Solve MSVCR110.dll Is Missing Error :

Best Way to solve MSVCR110.dll error

Well the most easiest way to solve this error is by downloading and installing the Visual C++ Redistributable for Visual Studio which supports all the operating system xp or higher from the Microsoft website. During the install of Visual C++ Redistributable for Visual Studio the installer replaces the MSVCR110.dll file with a new one and also put new values in the registry. This solution works perfectly  fine in 99.8 % cases. If it doesn't solve your problem be sure to read the other methods given below.
The requirement to install Visual C++ Redistributable for Visual Studio (7 MB file) are :
900 MHz or faster processor
512 MB of RAM
50 MB of available hard disk space
5400 RPM hard drive

Other ways to fix MSVCR110.dll

Restore your computer using the restore point:

You can restore your computer to a earlier time at which the error isn't popping up through the system restore utility of the Windows. If you are using windows 8 on mobile devices then swipe in from the right edge of the screen, and then tap Search and if you are using windows 8 on a desktop then point the cursor to the upper-right corner of the screen, and then click Search.In the search box, type system restore(to open system restore), and then press Enter. Window 7/vista users click Start,type system restore(to open system restore) in the search box, and then press Enter.If you're prompted for an administrator password or confirmation, type the password or provide the confirmation.
Select your preferred backup from the list and click on next and then click on finish.

Restore your computer registry and registry clean up software

There are a lot of ways to backup and restore registry. If the problem is caused by a wrong entry in the Windows registry this can be quite useful. You can also use registry clean up software that removes and restores registry entries.

How To Delete An Undeletable File in Windows

By // 1 comment:
, , , , , ,
In this post I'll be telling you guys how to delete a file which can't be deleted or renamed because of an error saying The file name you specified is not valid or too long as shown in the images below.

Requirements

  • An ISO image of Slitaz(42 Mb) which you can download from this link
  • LiLi USB Creator which you can download from this link
First I will tell you the steps to delete the files and then I will tell the reason why this method works.

Steps To Follow

  1. Locate the undeletable files and then write the path on a piece of paper or you can remember the path as we will be needing that later.
  2. Create a Live USB of the Slitaz OS using LiLi USB Creator as shown below in the image
    Lili USB Creator
    Note:-In Step 2 of the LiLi USB Creator Wizard you will see a compatibility issue as shown below so need to worry just ignore that.
  3. Then you have to boot your PC or Laptop from this Live USB you just created.For this, restart your computer and enter into BIOS usually by pressing del, F2 or F10 as it varies from device to device or else you can search for your device on the internet.Change the setting in the boot option so that you can boot from usb.
  4. After you boot from your USB a menu will appear in which you will choose the first option Slitaz Live through arrow keys and then Press Enter.You will then see Slitaz's Desktop as shown below.
  5. To delete those files you have to go to the path which you noted down in the 1st step.For this, click the spider icon in the upper left corner and then choose PCMan File Manager from the System Tools as shown below
  6. A window will appear in front of you in which on the left sidebar you will see all your partitions like all three partitions of mine are shown in the image below.
  7. Now locate the undeletable files in one of these partitions and then select those files and delete them by pressing Shift + delete(to permanently delete) and this time deletion will work.
  8. Now after deletion you need to reboot your computer but this time boot from your Hard Disk(normal boot) and not from USB.For this just click on the Power Icon in the upper right corner and then choose Reboot system as shown.

Reason Why The Above Method Works

In Windows the file name cannot contain some characters shown below in the image.
The Screenshot images we just deleted contained ':' character in its file name so that was the main reason why it was showing us an error when we tried to delete or rename it.

On the other hand in Linux based OS the file names can contain any characters other than
  • a forward slash ( / ), which is reserved for use as the name of the root directory (i.e., the directory that contains all other directories and files) and as a directory separator
  • null character (which is used to terminate segments of text).
Spaces are permitted, although they are best avoided because they can be incompatible with legacy software in some cases.

Another type Of Undeletable File

There are two things about this file
  1. The file doesn't have a name
  2. It gives a permission error as shown when deleted or renamed.
The method used by me to delete this file was just as described in this post but instead of Slitaz OS I used Ubuntu as shown
PS:-The Screenshot images were saved by me when I was running Live Ubuntu on my Laptop.Since then I was not able to delete them in Windows until now. That's how I figured that if Ubuntu created those files then Ubuntu or any Linux based OS can remove it.

Top 5 8086 emulator for Windows Linux Mac

By // 2 comments:
, , , , ,
An emulator is a software that duplicates (or emulates) the functions of one computer system (the guest) in another computer system (the host), different from the first one, so that the emulated behaviour closely resembles the behaviour of the real system (the guest).
The 8086 is a 16-bit microprocessor chip designed by Intel. The 8086 emulator duplicates the functions of Intel 8086 microprocessor in your system. You can run your assembly language program in these emulator quite easily. While creating the list I have given priority to free and open source emulators that are designed especially for Intel 8086 and have removed the Windows emulators that does not provide support to Windows 7. Well here is the list :

1. i8086emu :

i8086emu is a cross-platform open source emulator for the Intel 8086 microprocessor. It can be easily installed on Windows, Linux and BSD. It provide support for dynamically loadable device plugins and some peripherals like a PIT, PIC, 8-segment-displays, buttons and leds. i8086emu comes with an ncurses and an GTK-2 GUI which is quite awesome.
DOWNLOAD LINK : http://sourceforge.net/projects/i8086emu/files/latest/download?source=navbar

2. Emu8086 :

It is the most powerful 8086 emulator and is compatible with intel and AMD processor. It is available for Windows and Linux (through wine). Emu8086 provides a large number of in-build commands and its GUI makes it quite easy and simple to use. This software is available for free trial and you have to buy the key if you want to use the software after few days. Still it is the best 8086 emulator for Windows
DOWNLOAD LINK :http://www.emu8086.com/

3. 8086Tiny :

8086tiny is highly portable and runs on practically any little endian machine, from simple 32-bit MCUs upwards. 8086tiny has successfully been deployed on 32-bit/64-bit Intel machines (Windows, Mac OS X and Linux), Nexus 4/ARM (Android), iPad 3 and iPhone 5S (iOS), and Raspberry Pi (Linux). Additional functionality can be added to 8086Tiny by downloading and customizing its repository available on GitHub.
DOWNLOAD LINK : http://www.megalith.co.uk/8086tiny/download.html

4. PCEmu :

PCEmu is Developed David Hedley for linux and BSD. PCEmu emulates an 8086-based machine with VGA text graphics, EMS memory, host file system access, and `hardware' debugging. The emulator uses the mfs.c code from Linux DOSEMU to mount Unix directories as drives under DOS, so you can transfer data from the host to the target easily.
DOWNLOAD LINK : http://sourceforge.net/projects/pcemu/files/latest/download

5. Q :

Q is a free emulator software that runs on Mac OS X , including OS X on PowerPC. Q is Mike Kronenberg's port of the open source and generic processor emulator QEMU from Fabrice Bellard. Q uses Cocoa and other Apples Core-technologies like Coreimage, Coreaudio and OpenGL for in- and output, saving the overhead of crossplattform APIs like SDL, FMOD or GTK. , such as Core Image and Core Audio, to achieve its emulation.
DOWNLOAD LINK : http://www.kju-app.org/

HOW TO RUN CMD AS SYSTEM IN WINDOWS 7 AND 8

By // No comments:
, , , , , , ,
Sometimes we need to run command prompt as system and not just as admin as the system account has move privilege then your admin account.

So how do we run the command prompt as system?

 Firstly you are need to have admin rights to the system.
Now you are needed to download PSTools from SysInternals.

Now, run your cmd as admin and use command cd to take it to the folder where you have downloaded the PSTools. Now type command psexec -i -s cmd.exe here the i is for interactive and s is for system.


Now it will pop up anther commad prompt which will have the system rights.

That's it, now you have a command prompt with system rights. ENJOY!


More info at:
http://verbalprocessor.com/2007/12/05/running-a-cmd-prompt-as-local-system/
http://technet.microsoft.com/en-US/sysinternals

NOTE: This is for education purpose only.

Windows Registry Backup And Restore

By // No comments:
, , , ,
Windows Registry is a hierarchical database that stores configuration settings and options on Microsoft Windows operating systems. It contains settings for low-level operating system components and for applications running on the platform that have opted to use the registry. The kernel, device drivers, services, SAM, user interface and third party applications can all make use of the registry. The registry also provides us with the means to access counters for profiling system performance.Since it contains a lot of important stuff of your operating system it is always advisable to make a backup of it before messing it up.

Windows registry backup and restore without any software (3 methods)

1. Regedit

Backup of windows registry

Step 1:This step is different for window 7/vista and 8 user. If you are using windows 8 on mobile devices then swipe in from the right edge of the screen, and then tap Search and if you are using windows 8 on a desktop then point the cursor to the upper-right corner of the screen, and then click Search.In the search box, type regedit.exe(to open Registry Editor), and then press Enter. Window 7/vista users click Start,type regedit.exe(to open Registry Editor) in the search box, and then press Enter.If you're prompted for an administrator password or confirmation, type the password or provide the confirmation.
Step 2: In registry editor, locate and select the registry key that you want to back up. If you want to backup the whole registry select the Computer in registry editor.
Registry Editor

Step 3: After making the proper selection as per your requirement select File and then click Export,select the location where you want to store the backup , enter the file name and click on save.
Export Registry from the Registry Editor


Restore of windows registry

Step 1:This step is different for window 7/vista and 8 user. If you are using windows 8 on mobile devices then swipe in from the right edge of the screen, and then tap Search and if you are using windows 8 on a desktop then point the cursor to the upper-right corner of the screen, and then click Search.In the search box, type regedit.exe(to open Registry Editor), and then press Enter. Window 7/vista users click Start,type regedit.exe(to open Registry Editor) in the search box, and then press Enter.If you're prompted for an administrator password or confirmation, type the password or provide the confirmation.
Step 2:In Registry Editor, select File and click on Import.File dialogue box should open up,after that browse the desired backup registry file and click on open. It will take few seconds to complete the operation.
Import or Restore the Exported Registry


2. Windows registry backup and restore using Command Prompt  

Alright if you are the type of guy who likes doing the things through the technical way this method is for you. This method is also quite useful when you have created a back door in your windows operating system(learn how to create a backdoor in windows) Let's start first of all start the command prompt (press window key + r to start run, type cmd and click on enter). Console registry tool provide a lot of options as you can see below.
Registry Backup and Restore via CMD
If you want to learn about operation of console registry backup type :
reg operation /?
replace operation in above command by the operation you want to perform i.e. query, add, delete, copy, save, load, unload, restore, compare, export, import or flags.

Backup of windows registry

Alright i am gonna explain the export method which is used for backing up the window registry. The reg export command take two parameters, first one is registry key to export and second one is location where you want to save the registry key.
REG EXPORT HKEY_CURRENT_USER\system D:\Backups
this command will create a backup for the HKEY_CURRENT_USER\system at the the location D:\Backups.

Restore of windows registry

 Restore operation will be used to restore the backup. It have the following format :
reg restore keyName fileName
where keyName is the name of the registry key we want to restore and fileName is the location of the saved key. If we want to restore the HKEY_CURRENT_USER\system backup that we created above using reg export we will type
REG RESTORE HKEY_CURRENT_USER\system D:\Backups

3. Windows registry backup and restore using System Restore 

System Restore is a feature in Microsoft Windows that allows the user to revert their computer's state (including system files, installed applications, Windows Registry, and system settings) to that of a previous point in time, which can be used to recover from system malfunctions or other problems. First included in Windows ME, it has since been included in all following desktop versions of Windows released since, excluding the Windows Server.

Backup of windows registry

To create a backup of windows registry using system restore press window + r key type systempropertiesprotection.exe and click enter a  window as shown below will appear.
select Create that is present at the right bottom of the window and type the name for the backup and you are done, quite simple isn't it.
Backup Registry via System Restore

Restore of windows registry

Now lets talk a little about restore the backup of windows registry through the system restore point.
If you are using windows 8 on mobile devices then swipe in from the right edge of the screen, and then tap Search and if you are using windows 8 on a desktop then point the cursor to the upper-right corner of the screen, and then click Search.In the search box, type system restore(to open system restore), and then press Enter. Window 7/vista users click Start,type system restore(to open system restore) in the search box, and then press Enter.If you're prompted for an administrator password or confirmation, type the password or provide the confirmation.
Select your preferred backup from the list and click on next and them click on finish. Amazing and super easy isn't it.
Restore Registry via System Restore

Well that's it for creating a backup and restore of windows registry without using any software.

Windows registry backup and restore using software

Now a days, number of free and paid software are available for backing up and restoring windows registry. Here is a list of some of the most used, trusted and free software for doing backup/restore with their download links.

Wise Registry Cleaner

When  I first used this software I couldn't even believe that it is free. This software  provides a large feature like Registry Cleaner, System Tuneup, Registry Defrag, and Scheduler. Developer of this software has really worked hard to make this software it has most amazing GUI among all the software given here.Alright let's talk about main stuff. To create  a backup of windows registry using wise registry cleaner you have to select the backup option present on the upper portion on the home screen of the screen two option will appear in front of you as soon as you click on backup select create a full registry backup and your registry backup will start. To restore the backup you have created, firstly you have to select restore option also present on the upper portion of the software and then select the preferred backup for restore and click on restore present at the left bottom.
Wise Registry Cleaner Software
download link :http://www.wisecleaner.com/soft/WRCFree.exe

RegBak

 This software is super easy to use with its GUI interface(also have a command line interface). To create a backup of windows registry through RegBak, run the software select the location where you want to keep the backup of your registry and click next, backup process will start doing its work. You can use advanced options to select only few registries for backup. Well, that nearly covers all the steps for backup.Now, to restore your backup select view -> backups and after selecting your preferred backup click on restore.
RegBak Software

To use it through command line type regbak "location" /reg:suo /silent /overwrite /limitdays:d /limitcount:c in command prompt, replace location by the directory address to which you want to store your backup.
/reg:suo s=system hives u=user hives, o=all other hives.
/silent silent operation.
/overwrite overwrites previous backup files in the 'backup to' location.
/limitdays:d d = number of days of backups to keep, older backups will be deleted.
/limitcount:c keeps last 'c' number of backups.
for example the command regbak "D:\mybackup" /reg:suo will backup all your registry to loaction D:\mybackup.
download link : http://acelogix.com/downloads/regbak.zip


Registry Backup

The best thing about this software is that it can be used through a USB drive, so if you have messed up system and it is not as starting up properly you can use some small Linux OS live cd and copy the registry backup created by Registry Backup software and paste it inside C: drive you don't need to worry about path as the backup by registry backup is saved with the full path to registry all you have to do is just a simple copy and you are done. Now to backup using this software you just have to press the button Backup Now that is present at the left bottom on the home screen of the registry backup software, this will create a backup at the default location C:\RegBackup\. Alright now let's talk about the restore process which is as simple as the backup. First select the Restore Registry option present at the top tab of software then select your backup and click on Restore Now button.
Registry Backup Software

Registrar Registry Manager

This software offers solutions for backing up and restoring registries, fast background  search and replace, a bookmark editor with categories which supports key coloring and adding descriptions  to registry keys and values, detailed property pages, tools for easy navigation. The program offers multilevel undo so all registry changes can be individually undone. Also have a command line interface.
Registrar Registry Manager

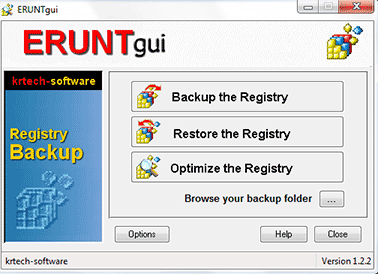
Erunt

This software was created for one job that was to create the registry backup for the windows xp operating system. This software comes with a command line version which you can use under D.O.S. when your window won't boot. This software have some problems with the operating systems that come after windows xp. Still it is great software for creating backups.
Erunt Software

RegKey Backup

This software is developed by Camtech2000, it supports all the operating system up to window xp. This software is quite easy to use and provide option to select only a few hives of the windows registry for backup and restore. The software isn't in much use today as it doesn't support newer windows operating system.
RegKey Backup Software


Hide drive in windows 8 and 7

By // 1 comment:
, ,

Well it is quite easy to hide a drive in windows system.You will need administrative rights to hide a drive through command prompt. There isn't much to explain on this topic, so here are the steps that you'll need to follow.

Steps to hide the drive via Command Prompt

  • Click on start type cmd, right click on the program cmd and select run as administrator. 
    running cmd as admin
  • Now type diskpart inside command prompt and press enter.
    executing diskpart command
  • Type list volume, on pressing enter a list of all the drives on your computer will appear in front of you.
  • list volume command execution
  • You can use either the volume Ltr or number in the next command. For example , if I want to remove my drive F then I will type either select volume F or select volume 5 and hit enter. After selecting the drive I will type another command remove letter F and then press enter.
  • select volume and remove letter commands
  • That's it the drive F: is no longer visible in explorer.
  • Final Result


To make the drive visible again follow the following steps.

  • Follow the first three steps up to list volume command as it is. Select the volume number of the drive you want to make visible again and type select volume volume_letter, since I want to make my drive F: to appear in the explorer I will type select volume 5. After selecting the drive type assign letter F (change F to your drive letter).
  • select volume and assign letter commands
  • My hidden drive is back in the explorer.
    Hidden Drive is Visibile Again

Steps to hide the drive via Windows Registry Editor

Another method for hiding the drives or partitions in Windows is by making changes in the Windows Registry using Registry Editor.
  1. To open Registry Editor, press Windows key + R and write regedit in the textbox.
  2. Press Enter.
  3. The Registry Editor window will appear as shown.
    Registry Editor

  4. Now locate the HKEY_CURRENT_USER\Software\Microsoft\Windows\CurrentVersion\Policies\Explorer where you will create a new DWORD (32-bit) Value by Right Clicking in the Right Pane as Shown below in the Image
    Creating New DWORD(32 bit)
  5. Give a Name to the New Key i.e Hide Drives Or No Drives etc and Double Click on that a dialog box will appear.
  6. Now Switch to Decimal Mode and Type the Value to Hide the Specified Drive for example to Hide Drive B type 2 in the Value Field As Shown Below
  7. Enter value in decimal format corresponding to a Drive
  8. For other drive letters enter the decimal value according to the following table:-
    A: 1 E: 16 I: 256 M: 4096 Q: 65536 U: 1048576 Y: 16777216
    B: 2 F: 32 J: 512 N: 8192 R: 131072 V: 2097152 Z: 33554432
    C: 4 G: 64 K: 1024 O: 16384 S: 262144 W: 4194304 ALL: 67108863
    D: 8 H: 128 L: 2048 P: 32768 T: 524288 X: 8388608
Note:- If you want to hide more than one drive then enter the sum of all the values of the drives int value
For Example – If you Want to Hide Drive E,F then type 48 (16+32) in the value field

Unlock windows 8/7/vista/xp/NT/Server

By // No comments:
, , , , , , ,

This tutorial can be used to break the password of following operating system of Microsoft :
  • Windows NT 3.5
  • Windows NT 3.51
  • Windows NT 4.0
  • Windows 2000
  • Windows XP
  • Windows Server 2003
  • Windows Vista
  • Windows Server 2008
  • Windows 7
  • Windows 8
  • Windows Server 2012
Things required to break the password using this method are a usb, these files and a mind to follow the steps.

Let's start...

  • Unzip the downloaded file and copy the content(files shown below) into the usb drive.Old files of usb will not get affected.
  • Click on start type cmd, right click on the program cmd and select run as administrator.
running cmd as admin

  • Inside cmd window type H:\syslinux.exe -ma H: (replace H: with your usb drive letter). On successful execution of command a file named ldlinux.sys will get created. Since it is a system file it will not be visible to you by default. To view it click on start type folder options press enter select view and unchecked the "Hide protected operating system files(Recommended)".
file change after syslinux.exe -ma H:

  • Alright we have created a bootable usb for breaking the windows password. Now restart your computer enter the BIOS usually by pressing del, F2 or F10 varies from device to device.Change the setting in the boot option so that you can boot from usb.
  • Lots of options will appear after booting from the usb. Select as per your requirement, have fun. 
  • For more info visit http://pogostick.net/~pnh/ntpasswd .
Use for education purpose only.