Showing posts with label window 7. Show all posts

C Drive Showing Less Space Than Actual

By // 1 comment:
, , , , ,
For the past few days I was observing that my C drive's remaining space was reducing drastically even though I had uninstalled some large applications,emptied my Recycle Bin and also ran CCleaner software for clearing out temporary files, recent files,memory dumps etc. I also selected all the folders inside my C drive and saw their properties to calculate the amount space they were taking and it turned out that approximately 100GB was free in my C drive but in My Computers it was showing that there is less than 20 GBs of space remaining.

After some research I found that most of my space was eaten up by what is called shadow copies. These shadow copies contains System Restore Points and previous versions of files. So if you are like me who hasn't formatted his Windows even once since the purchase then most probably a lot of shadow copies must have been piled up. Now I am going to tell, how you can delete all but the most recent restore point and also manage the System Restore Disk Usage.

How to Delete all but the most recent Restore Point

Before following this procedure you can also check how many Restore Points(shadow copies) are actually there by opening System Restore Program and then select the check box saying Show more restore points.
restore_point

If you see many restore points which are dated 2-3 years back.Then you can follow the below given procedure to free up some space.
  1. Click on Start and type Disk Cleanup and then click on Disk Cleanup from Programs Section.
    disk_cleanup
  2. Choose C Drive and click on OK in the dialogue box that appeared.After click on OK it will calculate what all you can delete.
    drive_letter_selection
  3. Now click on Clean up System Files as shown below in the image.Then again the same dialogue box that appeared in step 2 will come and just like the previous step click on OK.
    Disk_cleanup
  4. Now go to the More Options Tab and choose Clean Up as shown below.
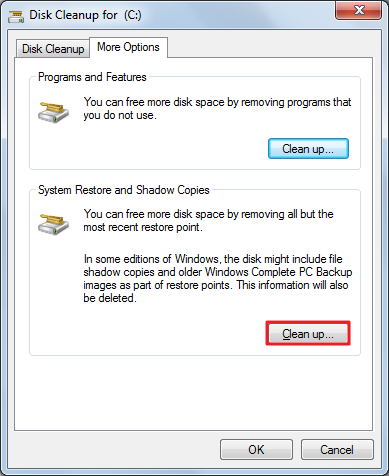
    disk_cleanup_2
  5. That's it and it may take some time.

How to manage System Restore disk Usage

  1. Open Computer and then click on System Properties
    system_properties
  2. Click on System Protection.
    system_protection
  3. A dialogue box will appear.In this box under Protection Settings Section select C Drive and then click on Configure as shown below.
    system_properties_configure
  4. Under Disk Space Usage section slide the bar according to you requirement like I had done as shown below.
    restore setting

How to crop and resize an image in microsoft paint

By // 5 comments:
, , ,
MS Paint or Microsoft Paint is a simple and easy to use computer graphics program that comes with all the versions of Microsoft Windows. Formerly known by Paintbrush for Windows. It is often referred to just as Paint. MS Paint provides a large number of basic operations like adding text to a image, creating background for a image, creating pixel based images, and a lot more. In this post  I will explain how you can crop and resize a image in Paint.

Opening an Image in MS Paint

Go to the location where the image you want to crop or resize/scale is stored. Right click on the image and select "Open with" and click on "Paint". This will open up your image in MS Paint.


Steps To Crop an Image

Step 1 : Use the zoom ratio present at the bottom left corner to control the display size of the image.


Step 2 :  Crop tool is the default selected  tool when you open up paint. Selection shape is set to "Rectangular selection" which is used most often. But their is one more selection shape known as "Free-form selection", it allows you to freely draw an area of any shape and clip it from the image. Click on "Select" present beside selected Crop tool to change the selection shape. It also have Selection options, out of all the selection options "Invert selection" is most important. It is used to when you don't want to include a selected region of an image.

Step 3 : When you draw the Rectangular selection box to select a portion of image its size appear in the bottom bar of Paint this can be used to create selection box of a fixed size.


Step 4 : After making the selection press "Ctrl + C" to copy the selection area. Open one more Paint application (Go to start and type paint). In the new paint window press "Ctrl + V" to paste the Selection. Now press "Ctrl + S" to open up the save dialogue box.

Resize / Scale an Image in MS Paint

Step 1 : Select the "Resize" option from the Home tab of the Paint. This will open up the "Resize and Skew" option box.


Step 2 : Now if know the pixel size ( H x V ) to which you want to scale the image enter the H and V value in Horizontal and Vertical box respectively and click on OK to resize the image. You can also use "Percentage" option to resize the image, most commonly used percentage ratio are 75%, 50%, 30%, and 200%. Skew is used to add slanting effect to the image.


How To Delete An Undeletable File in Windows

By // 1 comment:
, , , , , ,
In this post I'll be telling you guys how to delete a file which can't be deleted or renamed because of an error saying The file name you specified is not valid or too long as shown in the images below.

Requirements

  • An ISO image of Slitaz(42 Mb) which you can download from this link
  • LiLi USB Creator which you can download from this link
First I will tell you the steps to delete the files and then I will tell the reason why this method works.

Steps To Follow

  1. Locate the undeletable files and then write the path on a piece of paper or you can remember the path as we will be needing that later.
  2. Create a Live USB of the Slitaz OS using LiLi USB Creator as shown below in the image
    Lili USB Creator
    Note:-In Step 2 of the LiLi USB Creator Wizard you will see a compatibility issue as shown below so need to worry just ignore that.
  3. Then you have to boot your PC or Laptop from this Live USB you just created.For this, restart your computer and enter into BIOS usually by pressing del, F2 or F10 as it varies from device to device or else you can search for your device on the internet.Change the setting in the boot option so that you can boot from usb.
  4. After you boot from your USB a menu will appear in which you will choose the first option Slitaz Live through arrow keys and then Press Enter.You will then see Slitaz's Desktop as shown below.
  5. To delete those files you have to go to the path which you noted down in the 1st step.For this, click the spider icon in the upper left corner and then choose PCMan File Manager from the System Tools as shown below
  6. A window will appear in front of you in which on the left sidebar you will see all your partitions like all three partitions of mine are shown in the image below.
  7. Now locate the undeletable files in one of these partitions and then select those files and delete them by pressing Shift + delete(to permanently delete) and this time deletion will work.
  8. Now after deletion you need to reboot your computer but this time boot from your Hard Disk(normal boot) and not from USB.For this just click on the Power Icon in the upper right corner and then choose Reboot system as shown.

Reason Why The Above Method Works

In Windows the file name cannot contain some characters shown below in the image.
The Screenshot images we just deleted contained ':' character in its file name so that was the main reason why it was showing us an error when we tried to delete or rename it.

On the other hand in Linux based OS the file names can contain any characters other than
  • a forward slash ( / ), which is reserved for use as the name of the root directory (i.e., the directory that contains all other directories and files) and as a directory separator
  • null character (which is used to terminate segments of text).
Spaces are permitted, although they are best avoided because they can be incompatible with legacy software in some cases.

Another type Of Undeletable File

There are two things about this file
  1. The file doesn't have a name
  2. It gives a permission error as shown when deleted or renamed.
The method used by me to delete this file was just as described in this post but instead of Slitaz OS I used Ubuntu as shown
PS:-The Screenshot images were saved by me when I was running Live Ubuntu on my Laptop.Since then I was not able to delete them in Windows until now. That's how I figured that if Ubuntu created those files then Ubuntu or any Linux based OS can remove it.

HOW TO RUN CMD AS SYSTEM IN WINDOWS 7 AND 8

By // No comments:
, , , , , , ,
Sometimes we need to run command prompt as system and not just as admin as the system account has move privilege then your admin account.

So how do we run the command prompt as system?

 Firstly you are need to have admin rights to the system.
Now you are needed to download PSTools from SysInternals.

Now, run your cmd as admin and use command cd to take it to the folder where you have downloaded the PSTools. Now type command psexec -i -s cmd.exe here the i is for interactive and s is for system.


Now it will pop up anther commad prompt which will have the system rights.

That's it, now you have a command prompt with system rights. ENJOY!


More info at:
http://verbalprocessor.com/2007/12/05/running-a-cmd-prompt-as-local-system/
http://technet.microsoft.com/en-US/sysinternals

NOTE: This is for education purpose only.

IDM open file security warning unknown publisher solved

By // 4 comments:
, , , , , , , ,

Internet download manager (IDM) is the most used download manager of the windows operating system. It supports all the major browser available in market. Internet Download Manager segments downloaded files dynamically during download process and reuses available connections without additional connect and login stages to achieve best acceleration performance. It also have resume, schedule, queue, auto shutdown and other options. The simple graphical user interface with a large number of features makes it a prefect download manager.
         But a large number of user who uses the IDM suffers from the annoying open file security warning which pops up on every start up of the system and whenever the user opens up IDM. The pop-up does have a tick box saying "Always ask before opening this file", unchecking which does not have any effect whatsoever. Here is a snapshot of the problem.

Steps to solve open file security warning unknown publisher :

Step 1: First open up the Run by pressing window+R, after that type gpedit.msc inside and click on OK to open up the Local Group Policy Editor which is a Microsoft Management Console (MMC) snap-in that provides a single user interface through which all the settings of Local Group Policy objects can be managed.
Step 2: In Local Group Policy Editor select the Administrative Templates present under the User configuration. A list of folder will appear in front of as shown below.
Step 3: Double click on the Windows Component(seventh option) from the list of folders present in Administrative Template.
Step 4: Now open up the Attachment Manager by double clicking on it. A list of options will appear in front of you which are used to manage the file attachments.
Step 5: Alright after opening up a lot of folder in Local Group Policy Editor we have finally reached the option which we gonna edit. Double click on the Inclusion list of moderate risk files to open up it up. Select the Enable option from the three radio button present at the top to enable the Inclusion list of moderate risk files. In the Options present in the middle type the .exe as shown below and click on OK to save the changes. That's all you will not be annoyed by the IDM or any other .exe file type open file security warning unknown publisher.

4 ways to break windows 7 password without software

By // No comments:
, , ,
The 4 ways are divided into 2 sections depending upon the access :
1. Access to administrator account(3 ways).
2. Access to guest account or simple user account(1 way).
If you don't have access to any account on the PC. There are only two ways to enter the system through Backdoor or by using a Third Party Software.

Access to Administrator account

Using Command Prompt(cmd)

Command Prompt mostly referred as cmd is the windows command-line interpreter. Steps to break password using windows command prompt are:
Step 1:Click on start type cmd, right click on the program cmd and select run as administrator.
Start CMD as Administrator

Step 2:Inside cmd window type
net user User_Name *

where User_Name is the name of the account whose password you want to break, if you have any doubt regarding the user name of account you can check all the user account using net user command.
Step 3:Command Prompt will ask you to type a new password for the user.

Execute Net user command

Using Local Users And Groups

Local Users and Groups is a part of Computer Management. Steps to break password using Local Users And Groups are:
Step 1:Right click on My Computer and select Manage to open up the Computer Management. Select the first option System Tools.
Opening Computer Management

Step 2:Then select Local Users and Group from the System Tools. Two folder with name Users and Groups will appear in front of you.
Search for Local Users and Groups

Step 3:Open up the User folder and right click on the user name whose password you want to change. From the list of options select the Set Password.
Set Password

Step 4:Click on Proceed on the dialogue box.
Click on Proceed

Step 5:Enter the new password for user.
Enter new Password

Using User Accounts

Step 1:Press the windows key+r on keyboard to start the Run. Inside Run type control userpasswords2.
Start Run and type control userpasswords2

Step 2:User account will appear, Select the user account whose password you want to change.
Select the user

Step 3:Select the Reset Password option present in the bottom and enter the new password for the user.
Reset Password

Access to guest account or simple user account

Step 1:We will use the ring 0 exploit which provides privilege escalation on every version of Windows (from NT until 7). Download the exploit from here.
Step 2:Unzip the file and open up the folder.
Step 3:Run the file vdmallowed.exe, a command window(cmd) with admin privilege will open up.
Run the file vdmallowed.exe as Administrator

Step 4:Now use method 1 (using command prompt) to change the password.

Execute net user command