Showing posts with label windows 8. Show all posts

How To Delete An Undeletable File in Windows

By // 1 comment:
, , , , , ,
In this post I'll be telling you guys how to delete a file which can't be deleted or renamed because of an error saying The file name you specified is not valid or too long as shown in the images below.

Requirements

  • An ISO image of Slitaz(42 Mb) which you can download from this link
  • LiLi USB Creator which you can download from this link
First I will tell you the steps to delete the files and then I will tell the reason why this method works.

Steps To Follow

  1. Locate the undeletable files and then write the path on a piece of paper or you can remember the path as we will be needing that later.
  2. Create a Live USB of the Slitaz OS using LiLi USB Creator as shown below in the image
    Lili USB Creator
    Note:-In Step 2 of the LiLi USB Creator Wizard you will see a compatibility issue as shown below so need to worry just ignore that.
  3. Then you have to boot your PC or Laptop from this Live USB you just created.For this, restart your computer and enter into BIOS usually by pressing del, F2 or F10 as it varies from device to device or else you can search for your device on the internet.Change the setting in the boot option so that you can boot from usb.
  4. After you boot from your USB a menu will appear in which you will choose the first option Slitaz Live through arrow keys and then Press Enter.You will then see Slitaz's Desktop as shown below.
  5. To delete those files you have to go to the path which you noted down in the 1st step.For this, click the spider icon in the upper left corner and then choose PCMan File Manager from the System Tools as shown below
  6. A window will appear in front of you in which on the left sidebar you will see all your partitions like all three partitions of mine are shown in the image below.
  7. Now locate the undeletable files in one of these partitions and then select those files and delete them by pressing Shift + delete(to permanently delete) and this time deletion will work.
  8. Now after deletion you need to reboot your computer but this time boot from your Hard Disk(normal boot) and not from USB.For this just click on the Power Icon in the upper right corner and then choose Reboot system as shown.

Reason Why The Above Method Works

In Windows the file name cannot contain some characters shown below in the image.
The Screenshot images we just deleted contained ':' character in its file name so that was the main reason why it was showing us an error when we tried to delete or rename it.

On the other hand in Linux based OS the file names can contain any characters other than
  • a forward slash ( / ), which is reserved for use as the name of the root directory (i.e., the directory that contains all other directories and files) and as a directory separator
  • null character (which is used to terminate segments of text).
Spaces are permitted, although they are best avoided because they can be incompatible with legacy software in some cases.

Another type Of Undeletable File

There are two things about this file
  1. The file doesn't have a name
  2. It gives a permission error as shown when deleted or renamed.
The method used by me to delete this file was just as described in this post but instead of Slitaz OS I used Ubuntu as shown
PS:-The Screenshot images were saved by me when I was running Live Ubuntu on my Laptop.Since then I was not able to delete them in Windows until now. That's how I figured that if Ubuntu created those files then Ubuntu or any Linux based OS can remove it.

HOW TO RUN CMD AS SYSTEM IN WINDOWS 7 AND 8

By // No comments:
, , , , , , ,
Sometimes we need to run command prompt as system and not just as admin as the system account has move privilege then your admin account.

So how do we run the command prompt as system?

 Firstly you are need to have admin rights to the system.
Now you are needed to download PSTools from SysInternals.

Now, run your cmd as admin and use command cd to take it to the folder where you have downloaded the PSTools. Now type command psexec -i -s cmd.exe here the i is for interactive and s is for system.


Now it will pop up anther commad prompt which will have the system rights.

That's it, now you have a command prompt with system rights. ENJOY!


More info at:
http://verbalprocessor.com/2007/12/05/running-a-cmd-prompt-as-local-system/
http://technet.microsoft.com/en-US/sysinternals

NOTE: This is for education purpose only.

IDM open file security warning unknown publisher solved

By // 4 comments:
, , , , , , , ,

Internet download manager (IDM) is the most used download manager of the windows operating system. It supports all the major browser available in market. Internet Download Manager segments downloaded files dynamically during download process and reuses available connections without additional connect and login stages to achieve best acceleration performance. It also have resume, schedule, queue, auto shutdown and other options. The simple graphical user interface with a large number of features makes it a prefect download manager.
         But a large number of user who uses the IDM suffers from the annoying open file security warning which pops up on every start up of the system and whenever the user opens up IDM. The pop-up does have a tick box saying "Always ask before opening this file", unchecking which does not have any effect whatsoever. Here is a snapshot of the problem.

Steps to solve open file security warning unknown publisher :

Step 1: First open up the Run by pressing window+R, after that type gpedit.msc inside and click on OK to open up the Local Group Policy Editor which is a Microsoft Management Console (MMC) snap-in that provides a single user interface through which all the settings of Local Group Policy objects can be managed.
Step 2: In Local Group Policy Editor select the Administrative Templates present under the User configuration. A list of folder will appear in front of as shown below.
Step 3: Double click on the Windows Component(seventh option) from the list of folders present in Administrative Template.
Step 4: Now open up the Attachment Manager by double clicking on it. A list of options will appear in front of you which are used to manage the file attachments.
Step 5: Alright after opening up a lot of folder in Local Group Policy Editor we have finally reached the option which we gonna edit. Double click on the Inclusion list of moderate risk files to open up it up. Select the Enable option from the three radio button present at the top to enable the Inclusion list of moderate risk files. In the Options present in the middle type the .exe as shown below and click on OK to save the changes. That's all you will not be annoyed by the IDM or any other .exe file type open file security warning unknown publisher.

Top 5 Windows Phone Apps For FIFA World Cup 2014

By // No comments:
, , , , , ,

Thumbnail
The 2014 FIFA World Cup is the 20th FIFA World Cup tournament currently taking place in Brazil.This is the second time that Brazil is hosting the tournament.Brazil first hosted the tournament in 1950. The FIFA World Cup 2014 began on 12 June, with a group stage, and its final is scheduled to be on 13 July. For this tournament 32 teams were qualified in the qualification matches between June 2011 and November 2013,which are as follows :-
Algeria FlagAlgeria Australia FlagAustralia Belgium FlagBelgium Costa Rica FlagCosta Rica
Argentina FlagArgentina Cameroon FlagCameroon Iran FlagIran Bosnia and Herzegovina FlagBosnia and Herzegovina
Honduras FlagHonduras Brazil FlagBrazil Côte d'Ivoire FlagCôte d'Ivoire Japan FlagJapan
Croatia FlagCroatia Mexico FlagMexico Chile FlagChile Ghana FlagGhana
Korea Republic FlagKorea Republic England FlagEngland USA FlagUSA Colombia FlagColombia
Nigeria FlagNigeria France FlagFrance Ecuador FlagEcuador Germany FlagGermany
Uruguay FlagUruguay Greece FlagGreece Italy FlagItaly Netherlands FlagNetherlands
Portugal FlagPortugal Russia FlagRussia Spain FlagSpain Switzerland FlagSwitzerland

List of top 5 Windows phone apps to let you enjoy the most out of the World Cup.

  1. WorldCupBrazil App IconWorldCupBrazil
    WorldCupBrazil app is beautiful in looks and at the same time small in size. After you have chosen your favourite team, the app would show you fixtures of its upcoming matches. It changes colour according to the team kit. This app also has a transparent live tile for the forthcoming matches.

    WorldCupBrazil ScreenShots
  2.  Onefootball Brasil App Icon Onefootball Brasil
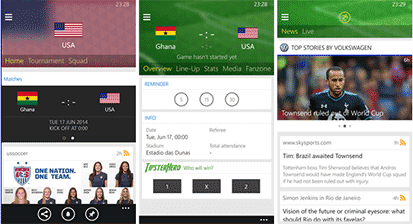
    Onefootball Brasil is a pretty fast and beautiful app. The home page contains news articles, videos related to your team or the World Cup. The items are sorted chronologically.From live score to statistics, it shows every bit of the World Cup.

    Onefootball Brasil ScreenShots
  3. Soccer 2014 Live App Icon Soccer 2014 Live
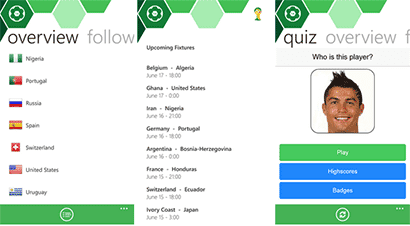
    Soccer 2014 Live shows real time data like match results, current scores, complete group tables, stadium info ,news , upcoming fixtures for all the matches.This app also consists of a fun quiz related to FIFA.

    Soccer 2014 Live ScreenShots
  4. Brazil 2014 App Icon Brazil 2014
    Brazil 2014 doesn't brag about push notifications or live scores. Instead, this app gives you information about all the 12 cities that host the World Cup, the stadiums and the teams that are participating. It also grabs official news from FIFA, it shows the scores of each match in each stage and it also includes videos, ranging from stadiums presentations to news related to the World Cup.

    Brazil 2014 ScreenShots
  5. Brasil - World Cup 2014 App Icon Brasil - World Cup 2014
    Brasil - World Cup 2014 includes sections for news, schedule, rankings, videos and it even has a chat feature. It's not the best looking or the most complete app out there, but it does the job.

    Brasil - World  Cup 2014 ScreenShots