Showing posts with label applications. Show all posts

Facebook's New App

By // No comments:
, , , , , ,
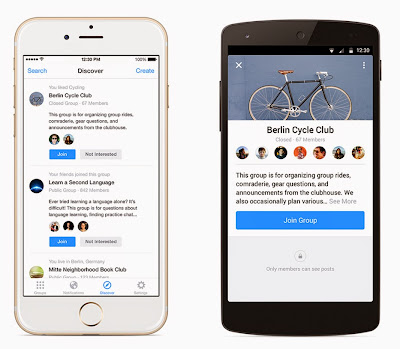
Yesterday Facebook's Creative Labs introduced its new application named Facebook Groups.As the name suggests this app gives you a dedicated space for you and your groups on facebook where you can share what you care about with the people who care about it most.That being said, you'll be happy to know that you can still use Facebook Groups in the main Facebook app and on Desktop.
Facebook Groups are great for...
* Families—share photos, organize vacations.
* Teams—post updates and schedules.
* Neighborhoods—borrow tools, share local news.
* School & Work—collaborate on projects, distribute notes.
This app from Facebook is available both for Android and iOS                                                                                  users.

Features

  1. Create
    You can start a group for anything: your family reunion, your after-work soccer team, your recipe sharing collective.
  2. Share
    Post updates, links and photos. Discuss, plan and collaborate. Share just with the people in your group.
  3. Discover
    Find and join new groups for whatever you’re into.
  4. Track Notifications
    You can also track notifications and easily control which notifications you want to see.
  5. Create Shortcuts
    You can add shortcuts of your favorite groups on your homescreen for quick access.

Run Android Apps on Your Browser

By // 2 comments:
, , , , , ,
In this post I am going to tell you How you can Run an Android App On Your Browser.For this we will use a browser based Android emulator that enables developers and QA testers to run and debug their apps on various Android device configurations and the name of this Emulator is ManyMo which is basically a website.
Advantages of ManyMo
  • Fast
  • Lightweight
  • No need of additional software
  • Start Up time is less

Prerequisites

You have to Sign up and Activate your account on this website to use the service.

Note:-This service has some limitations like
  • Allows you to launch only 10 Emulations per month.
  • You can only launch one emulator at a time that means you can't open a new tab and launch another emulator while an emulator is already running.
But if you want to launch more emulations at a time then you'll have to subscribe for it, which obviously will cost you money.
So lets start with the procedure.

Steps To Follow

  1. Login to your account on ManyMo.The image shown below is the page you'll see after login.
    The above image shows various Android Device Configurations from which you can select any one and launch the Emulator.
    Next to the Launch button is a DropDown List from where you can Choose which Android Version you want in the Emulator after launch.
  2. Now to run or test an Application you have to upload the .apk file for this you will click on App Before Launching the Emulator as show in the image below
    Now the click on browse and go to the path where your .apk file(for example ES File Explorer) is and then click on OK.
    After uploading is done you will be automatically directed to the page as shown below
  3. Now Choose the Emulator Resolution(Like I chose 1280X800 ) and the Android Version of your choice from the Dropdown List and click on Launch.
  4. You will now see that the ES File Explorer has been installed automatically and running on the Android Emulator in the image shown below
Similarly you can run any .apk file on your Web browser.

Some Extra Features

In the upper right corner of the emulator there are three options:-
  1. Devlop:- In Develop option You will get a Myanmo Token by which you can make this web based emulator as your local emulator(on your computer) and then you can use this emulator to test your applications.
  2. Embed:- In Embed option you will get a HTML code which you can use to embed the Emulator in a HTML page.
  3. Share:- In Share option you will get a Link which you can send to your friends and share application in this Emulator.

Top 5 8086 emulator for Windows Linux Mac

By // 2 comments:
, , , , ,
An emulator is a software that duplicates (or emulates) the functions of one computer system (the guest) in another computer system (the host), different from the first one, so that the emulated behaviour closely resembles the behaviour of the real system (the guest).
The 8086 is a 16-bit microprocessor chip designed by Intel. The 8086 emulator duplicates the functions of Intel 8086 microprocessor in your system. You can run your assembly language program in these emulator quite easily. While creating the list I have given priority to free and open source emulators that are designed especially for Intel 8086 and have removed the Windows emulators that does not provide support to Windows 7. Well here is the list :

1. i8086emu :

i8086emu is a cross-platform open source emulator for the Intel 8086 microprocessor. It can be easily installed on Windows, Linux and BSD. It provide support for dynamically loadable device plugins and some peripherals like a PIT, PIC, 8-segment-displays, buttons and leds. i8086emu comes with an ncurses and an GTK-2 GUI which is quite awesome.
DOWNLOAD LINK : http://sourceforge.net/projects/i8086emu/files/latest/download?source=navbar

2. Emu8086 :

It is the most powerful 8086 emulator and is compatible with intel and AMD processor. It is available for Windows and Linux (through wine). Emu8086 provides a large number of in-build commands and its GUI makes it quite easy and simple to use. This software is available for free trial and you have to buy the key if you want to use the software after few days. Still it is the best 8086 emulator for Windows
DOWNLOAD LINK :http://www.emu8086.com/

3. 8086Tiny :

8086tiny is highly portable and runs on practically any little endian machine, from simple 32-bit MCUs upwards. 8086tiny has successfully been deployed on 32-bit/64-bit Intel machines (Windows, Mac OS X and Linux), Nexus 4/ARM (Android), iPad 3 and iPhone 5S (iOS), and Raspberry Pi (Linux). Additional functionality can be added to 8086Tiny by downloading and customizing its repository available on GitHub.
DOWNLOAD LINK : http://www.megalith.co.uk/8086tiny/download.html

4. PCEmu :

PCEmu is Developed David Hedley for linux and BSD. PCEmu emulates an 8086-based machine with VGA text graphics, EMS memory, host file system access, and `hardware' debugging. The emulator uses the mfs.c code from Linux DOSEMU to mount Unix directories as drives under DOS, so you can transfer data from the host to the target easily.
DOWNLOAD LINK : http://sourceforge.net/projects/pcemu/files/latest/download

5. Q :

Q is a free emulator software that runs on Mac OS X , including OS X on PowerPC. Q is Mike Kronenberg's port of the open source and generic processor emulator QEMU from Fabrice Bellard. Q uses Cocoa and other Apples Core-technologies like Coreimage, Coreaudio and OpenGL for in- and output, saving the overhead of crossplattform APIs like SDL, FMOD or GTK. , such as Core Image and Core Audio, to achieve its emulation.
DOWNLOAD LINK : http://www.kju-app.org/

HOW TO RUN CMD AS SYSTEM IN WINDOWS 7 AND 8

By // No comments:
, , , , , , ,
Sometimes we need to run command prompt as system and not just as admin as the system account has move privilege then your admin account.

So how do we run the command prompt as system?

 Firstly you are need to have admin rights to the system.
Now you are needed to download PSTools from SysInternals.

Now, run your cmd as admin and use command cd to take it to the folder where you have downloaded the PSTools. Now type command psexec -i -s cmd.exe here the i is for interactive and s is for system.


Now it will pop up anther commad prompt which will have the system rights.

That's it, now you have a command prompt with system rights. ENJOY!


More info at:
http://verbalprocessor.com/2007/12/05/running-a-cmd-prompt-as-local-system/
http://technet.microsoft.com/en-US/sysinternals

NOTE: This is for education purpose only.

IDM open file security warning unknown publisher solved

By // 4 comments:
, , , , , , , ,

Internet download manager (IDM) is the most used download manager of the windows operating system. It supports all the major browser available in market. Internet Download Manager segments downloaded files dynamically during download process and reuses available connections without additional connect and login stages to achieve best acceleration performance. It also have resume, schedule, queue, auto shutdown and other options. The simple graphical user interface with a large number of features makes it a prefect download manager.
         But a large number of user who uses the IDM suffers from the annoying open file security warning which pops up on every start up of the system and whenever the user opens up IDM. The pop-up does have a tick box saying "Always ask before opening this file", unchecking which does not have any effect whatsoever. Here is a snapshot of the problem.

Steps to solve open file security warning unknown publisher :

Step 1: First open up the Run by pressing window+R, after that type gpedit.msc inside and click on OK to open up the Local Group Policy Editor which is a Microsoft Management Console (MMC) snap-in that provides a single user interface through which all the settings of Local Group Policy objects can be managed.
Step 2: In Local Group Policy Editor select the Administrative Templates present under the User configuration. A list of folder will appear in front of as shown below.
Step 3: Double click on the Windows Component(seventh option) from the list of folders present in Administrative Template.
Step 4: Now open up the Attachment Manager by double clicking on it. A list of options will appear in front of you which are used to manage the file attachments.
Step 5: Alright after opening up a lot of folder in Local Group Policy Editor we have finally reached the option which we gonna edit. Double click on the Inclusion list of moderate risk files to open up it up. Select the Enable option from the three radio button present at the top to enable the Inclusion list of moderate risk files. In the Options present in the middle type the .exe as shown below and click on OK to save the changes. That's all you will not be annoyed by the IDM or any other .exe file type open file security warning unknown publisher.

How To Install BlueStacks Android Emulator

By // 1 comment:
, , , , , , ,
BlueStacks App Player
BlueStacks is a Silicon Valley based mobile company that produced BlueStacks - App Player and Game Pop.
Both BlueStacks-App Player and Game Pop allows you to install and run Android Applications on your PC or Macintosh computers.So this software is useful for those Android Users who don't have smartphones with a big touch screen and high processing capability and want to enjoy android games on your PC.This software also lets you run applications in fullscreen.


In this post I am going to tell you , How to install and use your BlueStacks- App Player so that you can install your favorite Android games like Temple Run,Subway Surfers,Asphalt 8 etc on your PC or Mac.

So here's How

How to Install BlueStacks-App Player

  1. To install BlueStacks-App Player download the Installer Below is the download link:-
    BlueStacks - App Player Installer for Windows
    BlueStacks - App Player Installer for Macintosh
  2. Then after downloading the Installer ,launch it and make sure you are connected to internet because the Installer connects with their servers and downloads the software(BlueSacks - App Player).
  3. Now after Installation is complete Launch BlueStacks. It will take some time so be patient.
    BlueStacks Loading

  4. You have to do a One Time Setup.So click on My Apps as shown below in the image.
    One Time Setup Part 1 of 3
  5. Then after clicking on App Search it will ask you to Complete two steps which is a One Time Setup as shown below in the image and Click on Continue.
    One Time Setup Part 2 of 3
  6. Then it will ask you to add a Google Account so that your device is connected with your Gmail Account and can install apps from the Google Play Store.
    One Time Setup Part 3 of 3

    Note:-

    If your password consists of Capital Letters then you need to use the Virtual Keyboard which becomes visible on tapping the TextBox.

How to Install Android Application in BlueStacks

There are 3 Methods to install Android Applications.

Method - 1

  1. In this method you don't go to the BlueStacks for installing the Application instead You Do It From your PC or Mac but yeah , for this you need to open your BlueStacks before performing the following steps so that it(BlueStacks) gets initialized for seeing the download.
  2. Open your Web browser like Chrome ,FireFox or whatever you have installed on your PC or Mac not on the BlueStacks.Then go to Google Playstore and search for the app you want to install on BlueStacks.
    Method -1 Part 1 of 4
  3. A dailog box will appear asking you to sign in your google account.
    Method -1 Part 2 of 4
  4. After that another dailog box will appear from where you will select the device that corresponds to the BlueStack. You will know which device represents BlueStacks - App Player by viewing the dropdownlist which will show all your devices that you have synced with your Gmail Account.Then click on Install.
    Method -1 Part 3 of 4
  5. That's it.Now launch BlueStacks and the wait for 1 minute atleast now click on any app which doesn't run in full screen(which doesn't hides the notification bar) for example Hike.You can view the progress of the download slide down the notification bar by doing double clicking(1st Click --> 2nd Click(and then hold)) and dragging the bar down as shown below.
    Method -1 Part 4 of 4

Method - 2

  1. In this method you need to search for the application you want to install in BlueStacks App Player.
  2. For that click on App Search
    Method -2 Part 1 of 4
  3. Then Enter the name of the application you want to install in the search box and then click on Find.
    Method -2 Part 2 of 4
  4. Then a download links from various sites appear , So click on any of the Install buttons you see.And wait for the download and Install.
    Method -2 Part 3 of 4
  5. After this , to launch the application click on the respective game's icon in this case that would be Temple Run.
    Method -2 Part 4 of 4

Method - 3

If you have already downloaded the .apk file from any other site other than Google PlayStore then :-
  1. Go to the location where you have downloaded the .apk file, In my case the download location is the Desktop.
    Method -3 Part 1 of 3
  2. Just Double Click the .apk file but before that makes sure that the Default Program for apk file is set to BlueStacks Apk Handler. You can be sure of that if you see a BlueStacks icon on an .apk file as shown in the above image.If not, then Right click the .apk file and click on Choose the Default Programs and then choose BlueStacks Apk Installer as shown and then finally click on OK.
    Method -3 Part 2 of 3
  3. After you had set the default program to BlueStacks Apk Handler, as I told earlier you just have to double click on the .apk file then a dialog box will appear as shown in the image and your application will be installed in the BlueStacks.
    Method -3 Part 3 of 3

How to Uninstall An Application

To uninstall an Application there are two methods.

Mehtod - 1

  1. To uninstall a particular Application just double click the Application but hold the left mouse button down while doing the second click so that a cross appears on the App icon, in short do 1st Click --> 2nd Click(and hold) as shown below.
    Method -1 Part 1 of 2
  2. Then Click on the small cross in the upper right corner of the icon.Then an Uninstalling wizard will appear then click on OK.
    Method -1 Part 2 of 2

Method - 2

This method is basically for uninstalling multiple apps.
  1. Click on the Setting icon of the BlueStacks-App Player in the below right corner as shown below.
    Method -2 Part 1 of 3
  2. Then from the list select Manage Applications as show below.
    Method -2 Part 2 of 3
  3. Then select the application you want to delete by clicking on the Delete DustBin as shown and then click on Done.Actually when you click on delete for an application a message box appears for confirming the deletion and when you choose continue it uninstalls the app then and there.
    Method -2 Part 3 of 3

Accessing files from your computer in the BlueStacks

Check Out the Post :- How to Access files from your computer into the BlueStacks

How to Root BlueStacks

Check Out the Post :- How to Root BlueStacks

Top ten torrent client for linux

By // No comments:
, , , , , ,
Torrent clients, sometime called as BitTorrent client are computer programs designed for peer-to-peer file sharing using the BitTorrent protocol. Everyone needs a nice torrent client to manage their torrent download. Now day a large number of option are available to linux user when it comes to selecting the torrent client for their machine. In this article I am gonna tell you about the top ten free torrent client that are available on the internet for linux.

1. UTorrent :

Utorrent is without a doubt the most used torrent client on the desktop worldwide, this software is available for Windows, Mac, Linux and Android . It have a nice GUI, which makes it quite easy to use and modify. Even newbies can use this software efficiently. Provies a lot of option like speed limiter, auto shutdown, selected download, priority based download, nice graphical display of download/upload speed and lot more . Currently it is available for Debian 7.0, Debian 6.0, Ubuntu 13.04 and Ubuntu 12.04. Only drawback is it is not open source.
Utorrent

For Download Click Here


2. Deluge

Deluge is a free software, open source and cross-platform BitTorrent client written with Python and GTK+, it is available for Mac, Windows and Linux. The program uses the libtorrent-rasterbar C++ library as its backend for torrent networking functionality through the project's own Python bindings. Deluge is not designed for any one desktop environment and will work just fine in GNOME, KDE, XFCE and others. Also have a large number of plug in to increase the functionality. Have official and stable release for Foresight, Slackware, Gentoo, Arch, OpenSUSE, Fedora, Debian and Ubuntu.

Deluge

For Download Click Here


3. Transmission

Transmission is a lightweight GTK+ client, and is the official Ubuntu client. It comes preinstalled as of the 8.04 Hardy Heron release. It also support the command line interface and have web client. It is designed for easy and powerful use. The best part of this software is that it uses minimum resources of your system. Also have a large number of plug in to increase the functionality. It is available for Ubuntu, Fedora, OpenSUSE, Mandriva, CentOS, Debian, Puppy, Arch Linux, Slackware, FreeBSD, Gentoo, Pardus and NetBSD.
Transmission

For Download Click Here


4. qBitTorrent

qBittorrent is a free software cross-platform BitTorrent client which uses uses the Rasterbar libtorrent library and is available for Linux, Windows and Mac. qBittorrent is written in the C++ programming language (utilizing the Boost C++ libraries). It also uses the Qt4 framework. Its optional search engine is written in the Python programming language. qBittorrent is an attempt to provide a μTorrent equivalent that is open-source and multi-platform adding a streaming-like function to let users download-and-play video file.
QBittorrent

For Download Click Here


5. Ktorrent

KTorrent is a BitTorrent client that is part of the KDE Software Compilation. It is the most used torrent client in KDE-based distributions. KTorrent is a BitTorrent client written in C++ using the Qt user interface toolkit. It have a nice GUI. You need to install libktorrent(which is different for each version) before installing the Ktorrent package. Ktorrent does not have a lot of plug-ins like Transmission and Deluge.
KTorrent

For Download Click Here


6. Vuze

Vuze is written in Java (should have used C to make it a bit lightweight) , and uses the Azureus Engine. It is available for Mac, Windows, Linux and Android. If you want a simple lightwight torrent client this product is not for you, it is the most resource intensive torrent client of the list. In addition to downloading data linked to .torrent files, Azureus allows users to view, publish and share original DVD and HD quality video content. Content is presented through channels and categories containing TV shows, music videos, movies, video games, series and others. Also offers a large number of plug-ins.
Vuze

For Download Click Here


7.Tixati

Tixati is developed by Kevin Hearn and it is available for Linux and Windows. It is written using C++ so it is quite light weight. Alongside the full version, a portable version is offered which does not require installation can be run on USB flash-drives or other portable media. Support any recent Linux distribution with GTK2 libraries.
Tixati

For Download Click Here


8.rTorrent

rTorrent is a text-based ncurses BitTorrent client written in C++, based on the libTorrent libraries for Unix, whose author's goal is "a focus on high performance and good code". It is most lightwight and fast torrent client client in today's market. Since it is a terminal application, it can be used with the "screen"/"dtach" utility so that the user can conveniently logout from the system while keeping the file transfers active. A bit complex for newbies.
rTorrent

For Download Click Here


9.KGet

KGet is a download manager of KDE. By default it is the download manager used for Konqueror, but can also be used with Mozilla Firefox and other browser. KGet is part of the KDE Network package. Supports files download from FTP, HTTP(S) and BitTorrent sources. Tells lots of information about current and pending downloads. KGet is distributed under the terms of the GNU General Public License (GPL), Version 2.
KGet

For Download Click Here


10.Tribler

Tribler another bitTorrent client that is written using c and phyton. It is developed by Delft University of Technology and Vrije Universiteit. Tribler is an application that enables its users to find, enjoy and share content. The user interface of Tribler is very basic and focused on ease of use, instead of diversity of features. Tribler is based on the BitTorrent protocol and uses an overlay network for content searching, which makes the program operate independent of external websites and renders it immune to limiting external action, for example, government restraint.
Tribler

For Download Click Here